There are multiple peoples around the world who are running there own Website. There must be many peoples who Just wanted to migrate their wordpress website to a shared hosting using cPanel. This blog post is all about the migration of your wordpress site to cPanel.
Let’s get started.
Step 1 : Take a Backup of your WordPress application files along with the Database Dump.
Take the backup and download it to your local system. For this tutorials we have created a sample wordpress website on AWS ec2 Instance. Which looks like below.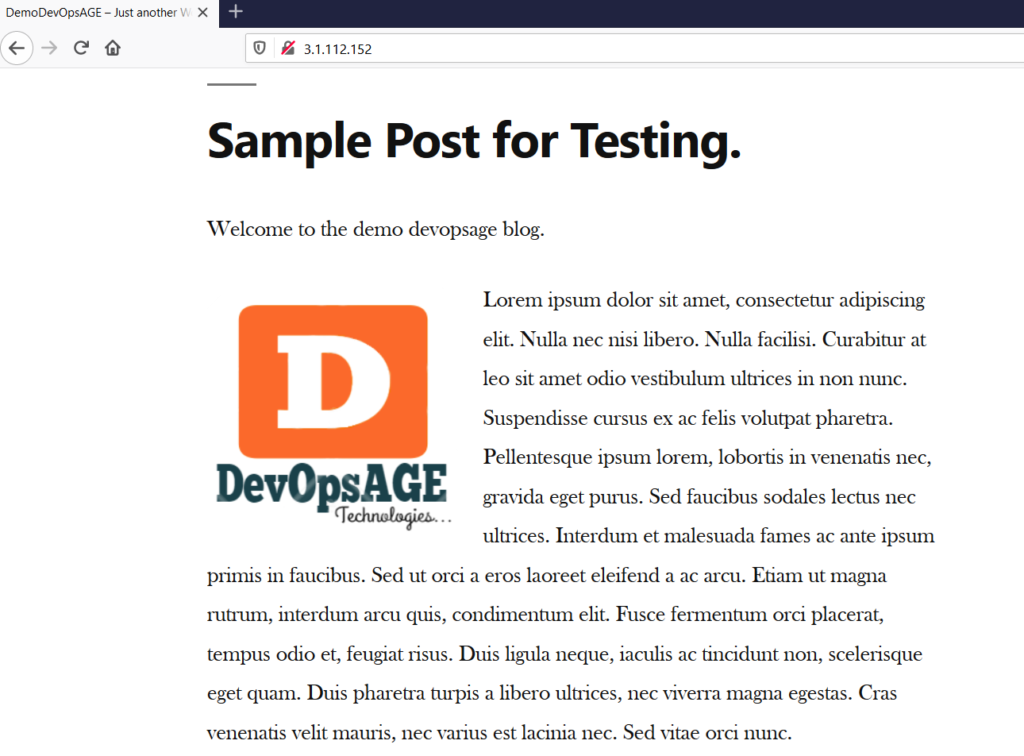
Login to the Server and take backup of Website files and directory. use the below command to take the backup of It.
Note: You can either use any of the FTP Client to archive and download application files. for this demo we will be using Linux command lines.
# ubuntu@ip-172-31-18-68:~$ tar -cvzf demodevops.tar.gz /var/www/html
# ls -l
Now take the backup of your wordpress website database using the below command.
# mysqldump -u root -p<yourdb_password> db_name > wordpress.sql
# ls -l
Step 2 : Pull backup files to Local machine.
Once we have taken the backup of both database and websites files and folder, It’s time to pull it from the Server to your local machine. for this we will be using secure copy (scp) command.
Come back to your home and execute the below command.
$ scp -i Downloads/your-test-key.pem ubuntu@<public_ip>:/home/ubuntu/demodevops.tar.gz .
$ scp -i Downloads/your-test-key.pem ubuntu@<public_ip>:/home/ubuntu/wordpress.sql .
Extract the the application file and change it to zip. use below command to do so.
$ tar -xvzf demodevops.tar.gz
Step 3: Upload Website Files and Folder to cPanel.
Login to cPanel Account and Search for File Manager and Click on It.
Double Click on public_html where we will be creating the document root.
Note: To know more about the installation and Configuration of WHM and cPanel, Please refer our previous blogs.
Now Upload the Backup website folder inside public_html. Make sure you convert the backup file to zip format.
Click on Upload => Select file => select the folder of backup website and Upload.
Once ziped file is Uploaded, Just Extract it by right Clicking on it.
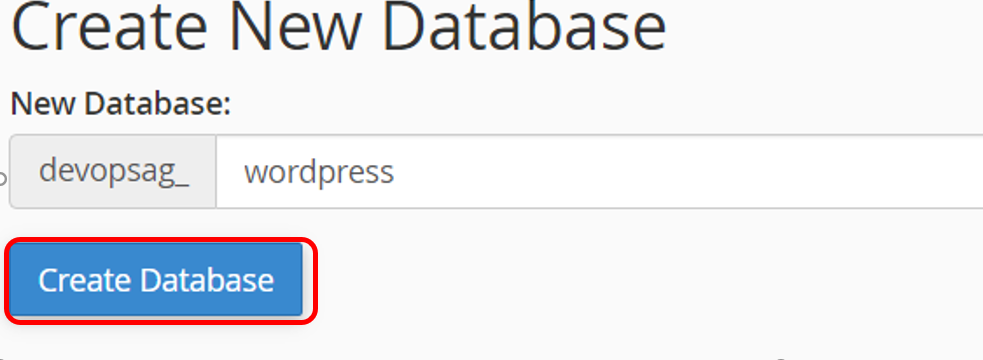
Step 4: Create Database and User and Upload Mysql Dump to It.
Search for Database in cPanel and Click on MYSQL Databases as Shown in the screenshot.

Now Create a Database with a name say, devopsag_wordpress.
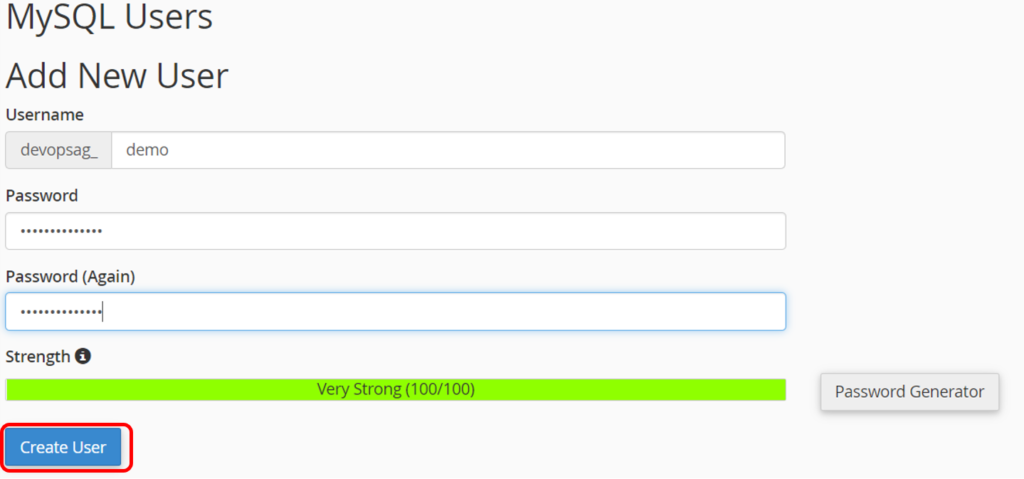
Next is to Scroll down and Create a database user and assign secure password to it.
Final thing is to add this user to the created database allowing all the priviliges. This database credentials will be used in the application to authenticate wit the respective database.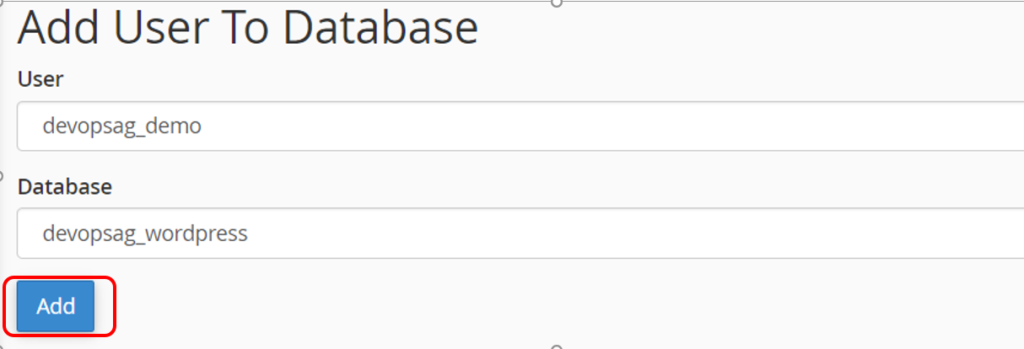
Make sure to grant all priviliges for database to the user.
Now we have to Upload the Database dump to created database. In cPanel Search for PhpMyAdmin and Click on It. you will be redirected to the PhpMyAdmin page. Select the database which you have created and import the sql file.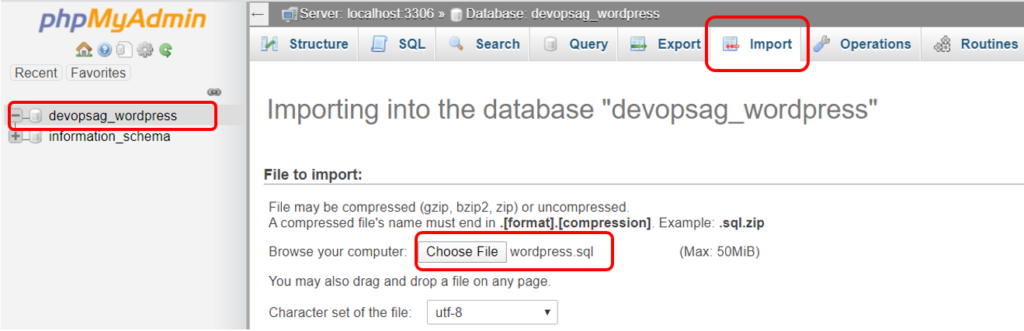
Now Once the database Uploaded then move to the next Step.
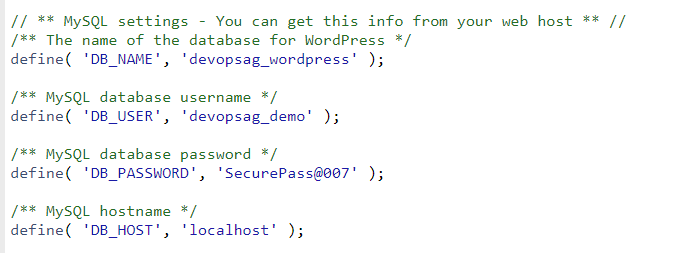
Step 5: Verify the DB Details and credentisl in wp-config.php file.
Make sure that you Inser correct database details in the wp-config.php file or else you will face “Error Establishing Connection to the Database“.
file path : public_html/demodevops/wp-config.php
Step 6: Add your domain to cPanel.
For adding a domain to cPanel please check this link.
Step 7: Redirect Primary Domain to a Specific Folder in cPanel
Whenever we are creating a cPanel Account in WHM, We need to use a Primary Domain for it. That Primary Domain by default points to /public_html and It can not be changed to any other Folder in cPanel
Go to File Manager ==> Settings (at top right corner) ==> Show Hidden files.
In /Public_html Create a hidden file called .htaccess and paste the below redirect rule.
RewriteEngine on
RewriteCond %{HTTP_HOST} ^(www.)?devopsage.tk$
RewriteCond %{REQUEST_URI} !^/demodevops/
RewriteCond %{REQUEST_FILENAME} !-f
RewriteCond %{REQUEST_FILENAME} !-d
RewriteRule ^(.*)$ /demodevops/$1
RewriteCond %{HTTP_HOST} ^(www.)?devopsage.tk$
RewriteRule ^(/)?$ demodevops/index.php [L]
See this blog to know more about Redirect Primary Domain to a Specific Folder in cPanel.
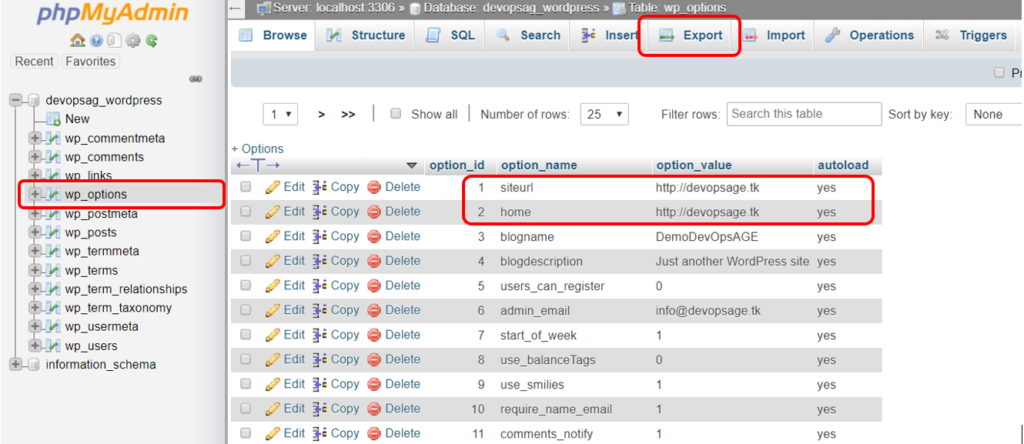
Step 8: Verify whether siteurl and home is pointing to correct domain in Database.
Go to PhpMyAdmin and Select your database. Click on table wp_options and check whether siteurl and home entry in database table is correct and pointing to your actual domain. If not then change it to point to correct domain. refer the screenshot below.
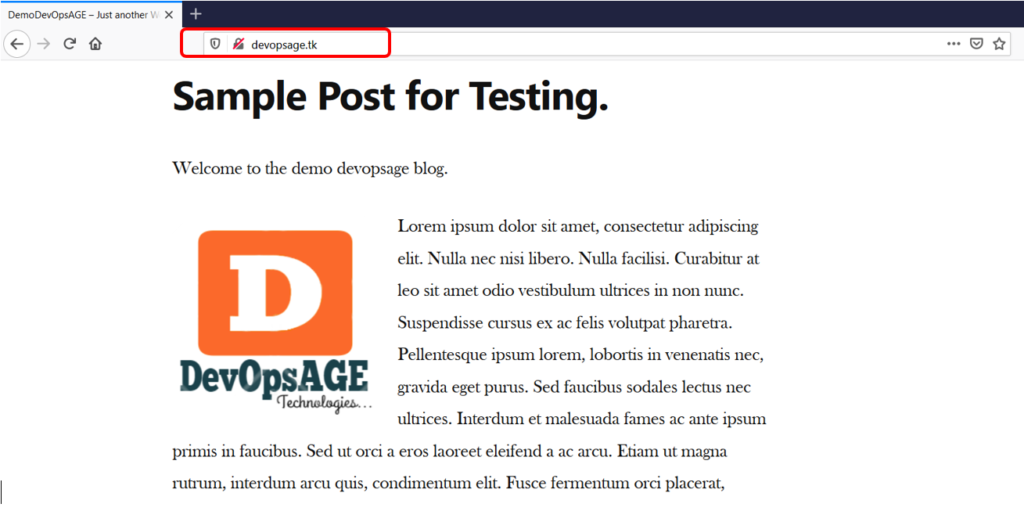
Now take the domain and hit on the URL to See whether the website is loading or not. for this tutorial post our test website is successfully migrated to our cPanel Account.
If you Like Our Content here at Devopsage, then please support us by sharing this post.
Please Like and follow us at, LinkedIn, Facebook, Twitter, and GitHub
Also, Please comment on the post with your views and let us know if any changes need to be done.
Thanks!
How to Install WordPress on Top of LAMP Stack on Ubuntu and Redhat/CentOS7 Server.
How to Install and Setup WHM and cPanel On CentOS7 – Part 1
Basic WHM Configuration and Hosting a Website in cPanel Account – Part 2
How to Create Email and FTP Account in cPanel – Part3
How to Redirect Primary Domain to a Specific Folder in cPanel.
Issue – cPanel Email Going to Spam.
Unable to Login cPanel FTP with Failed to Retrieve Directory Listing Error
How to Migrate Email Accounts from One cPanel to Another – Part 5
How to use an SSL Certificate for your cPanel Website for Free – Part 6
Redirect HTTP to HTTPS for your Website on cPanel – Part 7
How to Upgrade and Downgrade MariaDB Version in WHM/cPanel – Part 8
cPanel – phpMyAdmin asking for Username and Password. Error – Access Denied.