WordPress is the Most Widely and Popular Website Hosting Platform which ueses PHP and MySQL and is used by millions of users all over the globe. WordPress is Widely accepted all because of the User friendly UI Which is very easy to use. It does not required to have any prior coding knowldege, you can Simply Install It on top of LAMP Stack (Linux, Apache, Mysql, PHP) and can play around it to create your website. Using WordPress you can Create a fully functional Wesite. Most of the blogger useses WordPress for writing blogs which is easy to write and format. It has thousands of Supported Plugins which can be used as an add-ons to enhance the functionality of your website. Workpress uses MySQL/MariaDB Database for Storing all Website related contents. WordPress Websites are easy to manage, Can be backedup easily, Can easily be migrated. The best part of the WordPress is that, once it is setup the entire administrations tasks related to your website can be managed from the Web itself.
Let’s Start with the Installation Steps.
Install LAMP Stack on Ubuntu and CentOS7
Install Apache
To Install Apache, Login to your Linux Server and install the below package. Also Update the repository first.
For Ubuntu,
-------------
$ sudo apt update -y
$ sudo apt install apache2

For RHEL/CentOS
-----------------
$ sudo yum update -y
$ sudo yum install httpd
Now, lets make our own Custom Apache configurations file.
$ cd /etc/apache2/sites-available/
$ sudo cp 000-default.conf wordpress.conf
$ sudo vim wordpress.conf
Paste the below sample apache configuration.
<VirtualHost *:80>
        ServerAdmin webmaster@localhost
        DocumentRoot /var/www/html
        ErrorLog ${APACHE_LOG_DIR}/error.log
        CustomLog ${APACHE_LOG_DIR}/access.log combined
</VirtualHost>
Enable the new VirtualHost using the a2ensite utility and restart Apache2
$ sudo a2ensite wordpress

Optional - If wanted to disable
$ sudo a2dissite wordpress
Now, Check whether the Apache Configuration is correct or not using the belwo command.
$ sudo apache2ctl configtest
If you See the Syntax OK, then go ahead and restart apache service and also enable it to restart automatically on reboot.
$ sudo systemctl start apache2.service
$ sudo systemctl enable apache2.service
$ sudo systemctl status apache2.service
For Redhat/CentOS7
Use the below Configuration
$ sudo vim /etc/httpd/conf/httpd.conf

<VirtualHost *:80>
    ServerAdmin [email protected]
    DocumentRoot /var/www/html/wordpress
    ServerName devopsage
    ErrorLog /var/log/httpd/tecminttest-error-log
    CustomLog /var/log/httpd/tecminttest-acces-log common
</VirtualHost>

$ httpd -t // to check config syntx
Now get the IP and hit on Url, You will see the default apache page.
http://IP_Address/
Install and Setup MySQL Database
Next Step would be to Install Mysql Database and setup a database for the wordpress to store all website related data. Install both mysql-client and mysql-server package.
Note: A Terminal User Interface (TUI) will appear asking for the root password. Set the root password and verify It.
For Ubuntu
-----------
$ sudo apt-get install mysql-client mysql-server

For Redhat/CentOS7
-------------------
$ sudo yum install mysql-client mysql-server
Install Mysql using the below command. You will be Prompted for doing below initial configurations. do it according to your need or Just follow as below,
Would you like to setup VALIDATE PASSWORD plugin: no
Change the password for root ? : n
Remove anonymous users?: y
Disallow root login remotely?: y
Remove test database and access to it?: y
Reload privilege tables now? : y
$ sudo mysql_secure_installation
Login to the database and create a User and Database for the WordPress. Also Grant all priviliges to the wp-user on wordpress database. This database credentials we will be using later on WordPress configurations to connect to it.
$ sudo mysql -u root -p
mysql> CREATE DATABASE wordpress;
mysql> GRANT ALL ON wordpress.* TO 'wp-user'@'localhost' IDENTIFIED BY 'secure-password';
mysql> FLUSH PRIVILEGES;
msql> exit;
Install all the required php packages or extensions for WordPress.
For Ubuntu
-----------
$ sudo apt install php-curl php-gd php-mbstring php-xml php-xmlrpc php-soap php-intl php-zip php-cli -y

For Redhat/CentOS7
------------------
$ sudo yum install php php-common php-mysql php-gd php-xml php-mbstring php-mcrypt
To Check the Php version
$ php --version
Now all the required setup is done, so just go ahead and Download the latest WordPress zipped packages.
$ curl -O https://wordpress.org/latest.tar.gz
$ tar -xzvf latest.tar.gz
$ rm -rf latest.tar.gz
$ sudo cp -rv wordpress/* /var/www/html/
$ cd /var/www/html
$ sudo cp wp-config-sample.php wp-config.php
$ cd ..
$ sudo chown -R www-data.www-data html
Set the Correct file and directory permission. for this we will be using the find and execte command.
$ sudo find /var/www/html/ -type d -exec chmod 750 {} \;
$ sudo find /var/www/html/ -type f -exec chmod 640 {} \;
Now, Update the Database credentials detail on the wordpress configuration file.
$ sudo vim /var/www/html/wp-config.php
Put the user and database details as created above.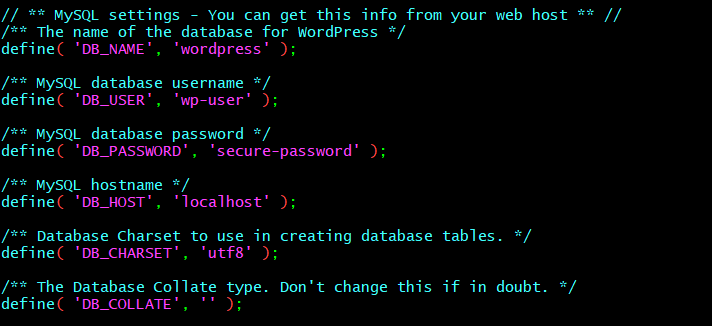
Find the section “Authentication Unique Keys and Salts” in the config. These KEY and SALT values usually provide a layer of encryption to the browser cookies that WordPress users store on their local machines. Basically, adding long, random values here makes your site more secure.
Visit , https://api.wordpress.org/secret-key/1.1/salt/ to generate random key value pair which need to be edited in the wp-config.php itself.
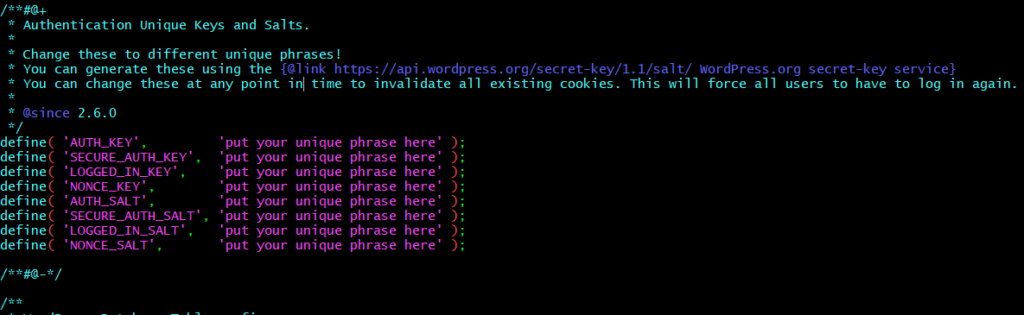
Get the random code and update in the config, the configuration should look something like below,

Note: Do not use the above Code, get your random code from the link provided.
Alternatevly, You can also use curl statement on the Terminal to get these key value pair, Simply copy and paste in the configurations.
$ curl -s https://api.wordpress.org/secret-key/1.1/salt/
Save and close the config and restart the apache and mysql service
$ sudo systemctl restart apache2.service  // Ubuntu
$ sudo systemctl restart httpd.service   // For Redhat/CentOS
$ sudo systemctl restart mysql.service
Note: make Sure to delete the index.html file from /var/www/html to avoid loading of the default ubuntu page. index.html resolves before index.php so if not deleted then index.php file will not load and you won’t be able to see wordpress on Web, rather than that defualt ubuntu web page will appear.
Now Grab the Ip Address and hit on the URL, You will See the Initial Page of WordPress as Shown in the Screenshot below.
http://IP_address/
Click Continue, and fill up the required details, like website title, Initial user and password.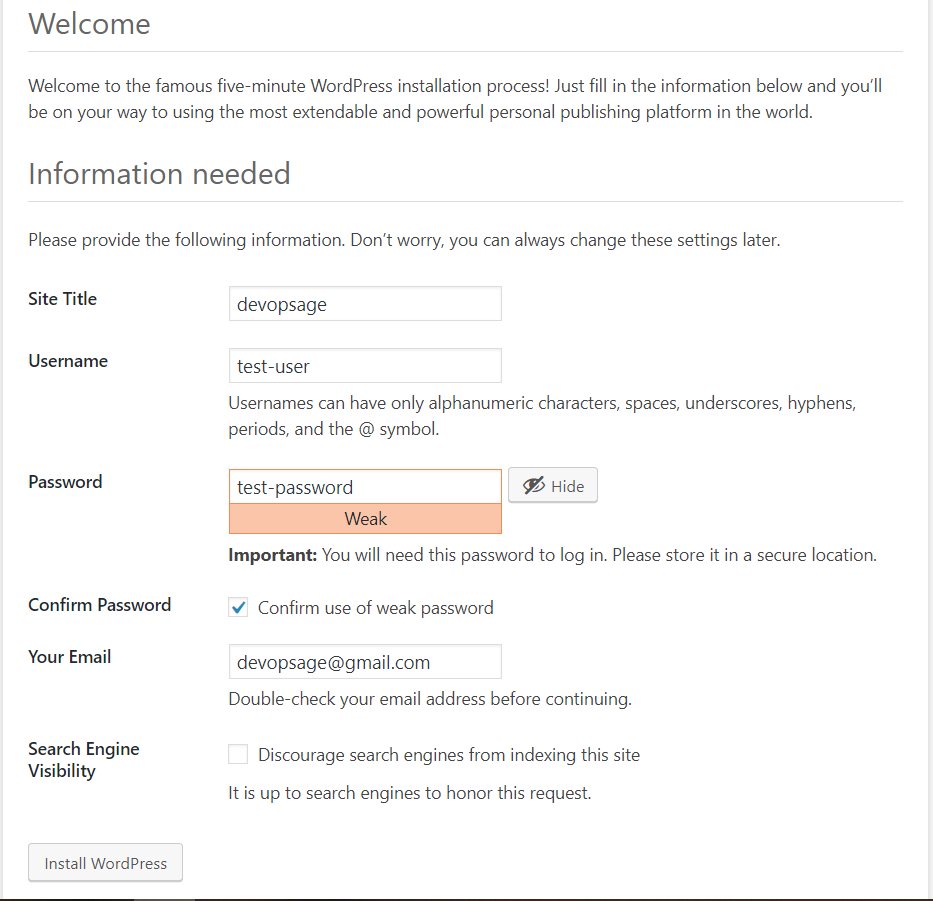
Click, Install WordPress. You will see a message that WordPress is installed successfully. Login to WordPress using the credentials.
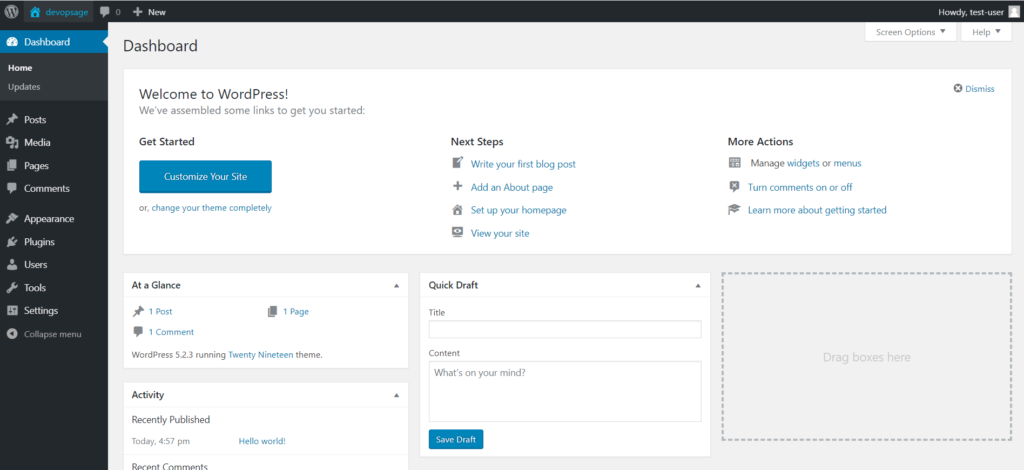
That’s It For this Article. Go ahead and create some beautiful websites
If you Like Our Content here at Devopsage, then please support us by sharing this post.
Please Like and follow us at, LinkedIn, Facebook, Twitter, and GitHub
Also, Please comment on the post with your views and let us know if any changes need to be done.
Thanks!
You may also need to look into below Posts,
How to Install and Setup WHM and cPanel On CentOS7 – Part 1
Basic WHM Configuration and Hosting a Website in cPanel Account – Part 2
How to Create Email and FTP Account in cPanel – Part3
How to Redirect Primary Domain to a Specific Folder in cPanel.
Issue – cPanel Email Going to Spam.
Unable to Login cPanel FTP with Failed to Retrieve Directory Listing Error
How to Migrate WordPress Website to cPanel – Part 4
How to Migrate Email Accounts from One cPanel to Another – Part 5
How to use an SSL Certificate for your cPanel Website for Free – Part 6
Redirect HTTP to HTTPS for your Website on cPanel – Part 7
How to Upgrade and Downgrade MariaDB Version in WHM/cPanel – Part 8