Introduction
In this post, we will see how we can configure and set up the AWS Directory Service step by step. In this, we will see how to use AWS AD Connector to enable your on-premises AD users to sign in to the AWS Management Console with their on-premises AD user credentials to access and manage AWS resources through IAM roles.
Prerequisite for AD Connector
We need the following things in order to connect to our on-premises directory with AD Connector:
VPC
Set up a VPC with the following:
- At least two subnets. Each of the subnets must be in a different Availability Zone.
- The VPC must be connected to your on-premises network through a virtual private network (VPN) connection or AWS Direct Connect.
- The VPC must have default hardware tenancy.
On-premises network
You’ll need an on-premises network with an Active Directory domain. The functional level of this domain must be Windows Server 2003 or higher.
Credentials
You must have credentials for an account in the on-premises directory with the following privileges.
- Read users and groups
- Create computer objects
- Join computers to the domain
IP addresses
Get the IP addresses of two DNS servers or domain controllers in your on-premises directory.
Ports for subnets
For AWS Directory Service to communicate with your on-premises directory, the firewall for your on-premises network must have the following ports open to the CIDRs for both subnets in the VPC.
- TCP/UDP 53 – DNS
- TCP/UDP 88 – Kerberos authentication
- TCP/UDP 389 – LDAP; note that AWS Directory Service does not support LDAP with SSL (LDAPS) or LDAP signing
Kerberos preauthentication
Your user accounts must have Kerberos preauthentication enabled.
Encryption type
Your on-premises domain controller and user accounts must have RC4-HMAC encryption enabled.
Steps:-
Delegating Connect Privileges
- To connect to your on-premises directory, you must have the credentials for an account in the on-premises directory that has certain privileges. While members of the Domain Admins group have sufficient privileges to connect to the directory.
- The following procedure demonstrates how to create a new group called Connectors, and delegate the privileges to this group that are needed to connect AWS Directory Service to the directory.
- This procedure must be performed on a machine that is joined to your directory and has the Active Directory User and Computers MMC snap-in installed. You must also be logged in as a domain administrator.
To delegate connect privileges
Step: 1
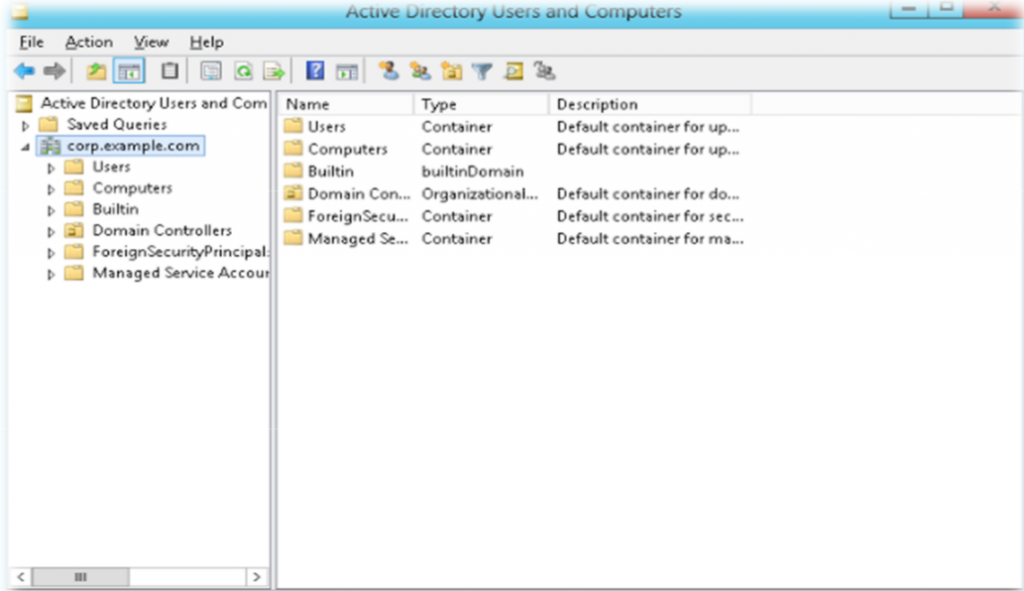
- Open Active Directory User and Computers and select your domain root in the navigation tree.
- In the list in the left-hand pane, right-click Users, select New, and then select Group.
- In the New Object – Group dialogue box, enter the following and click OK.
|
Field |
Value/Selection |
|
Group name |
Connectors |
|
Group scope |
Global |
|
Group type |
Security |
- In the Active Directory User and Computers navigation tree, select your domain root. In the menu, select Action, and then Delegate Control.

- On the Delegation of Control Wizard page, click Next, then click Add.
- In the Select Users, Computers, or Groups dialogue box, enter BCT-Connectors and click OK. If more than one object is found, select the BCT-Connectors group created above. Click Next.
- On the Tasks to Delegate page, select Create a custom task to delegate, and then choose Next.
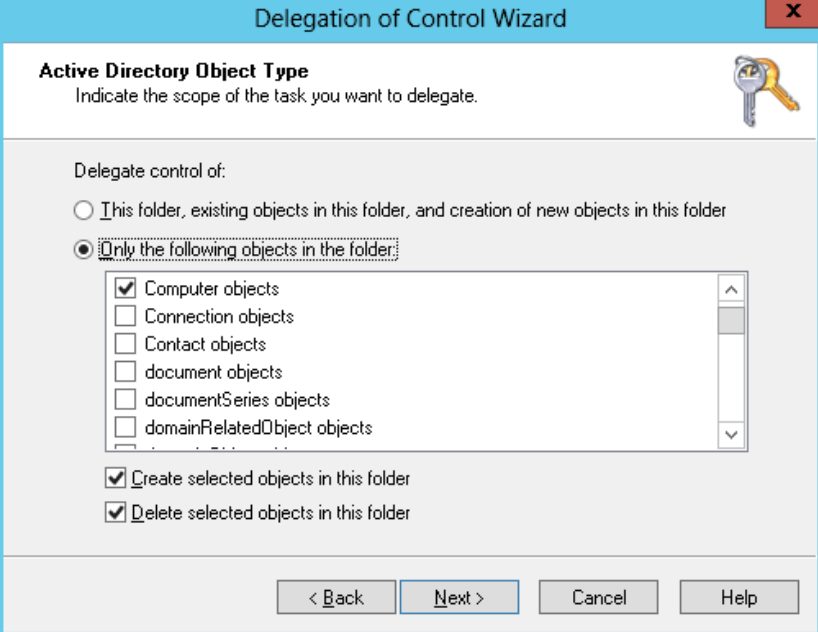
- Select Only the following objects in the folder, and then select Computer objects and User objects.
- Select Create selected objects in this folder and Delete selected objects in this folder. Then choose Next.
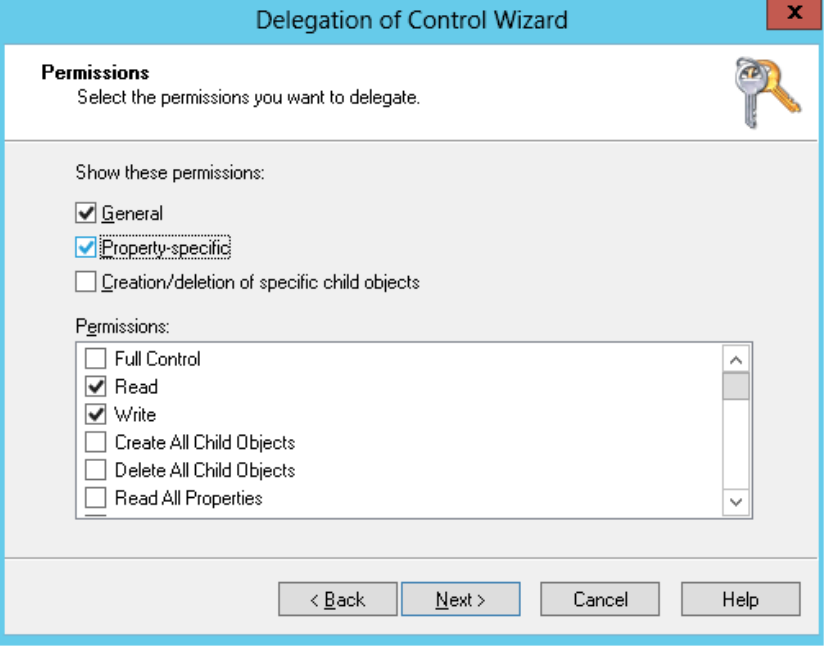
- Select Read and Write, and then choose Next.
- Verify the information on the Completing the Delegation of Control Wizard page, and click Finish.
- Create a user with a strong password and add that user to the Connectors group. The user has sufficient privileges to connect AWS Directory Service to the directory.
Step 2: Connect Verification
For AD Connector to connect to your on-premises directory, the firewall for your on-premises network must have certain ports open to the CIDRs for both subnets in the VPC. To test if these conditions are met, perform the following steps:
To verify the connection
- Launch a Windows instance in the VPC and connect to it over RDP. The instance must be a member of your on-premises domain. The remaining steps are performed on this VPC instance.
- Download and unzip the DirectoryServicePortTest test application. The source code and Visual Studio project files are included so you can modify the test application if desired.
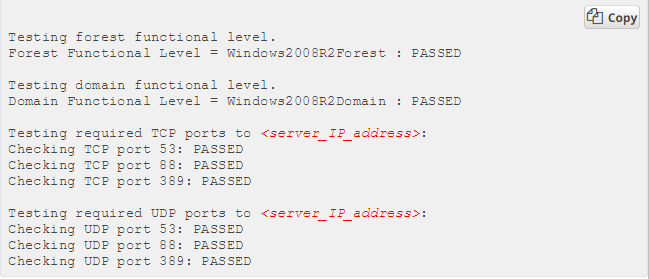
- From a Windows command prompt, run the DirectoryServicePortTest test application with the following options:
- C:\ DirectoryServicePortTest.exe -d <domain_name> \ -ip <server_IP_address> \ -tcp “53,88,389” \ -udp “53,88,389”
- The output will be similar to the following:
Step 3: Steps to Create an AD Connector
To connect to your on-premises directory with AD Connector, perform the following steps. Before starting this procedure, make sure you have completed the prerequisites identified in AD Connector Prerequisites.
To connect with AD Connector
- In the AWS Directory Service console navigation pane, select Directories and choose Set up the directory.
- Choose AD Connector.
Provide the following information:
- Connected directory DNS: The fully qualified name of your on-premises directory, such as yourdomain.in
- Connected directory NetBIOS name: The short name of your on-premises directory, such as DEVOPSAGE
- Connector account username: The username of a user in the on-premises directory.
- Connector account password: The password for the on-premises user account.
- Confirm password: Retype the password for the on-premises user account.
- DNS address: The IP address of at least one DNS server in your on-premises directory.
Description
An optional description for the directory.
Size
Select the size of the directory.
Provide the following information in the VPC Details section, and then choose Next Step.
VPC
The VPC for the directory.
Subnets
Select the subnets for the directory servers. The two subnets must be in different Availability Zones.
- Review the directory information and make any necessary changes. When the information is correct, choose to Create AD Connector.
- It takes several minutes for your directory to be connected. When it has been successfully extended, the Status value changes to Active.
Step 4: Enable Access to the AWS management console by using AWS Microsoft AD and On-Prem Credentials
- Create IAM role with the specific permission required.
- Create an access URL
To Create Access URL, follow the below steps,
-
Navigate to the Directory Service Console and choose your AWS Microsoft AD Directory ID.
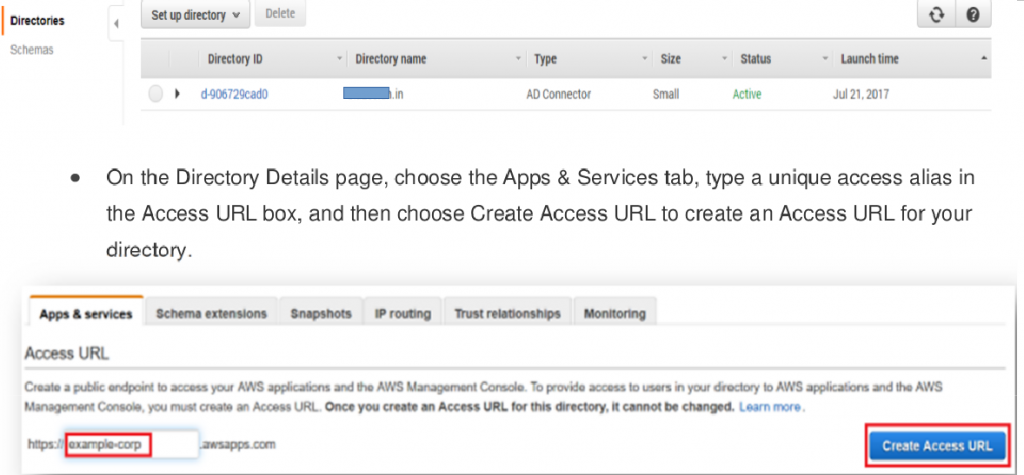
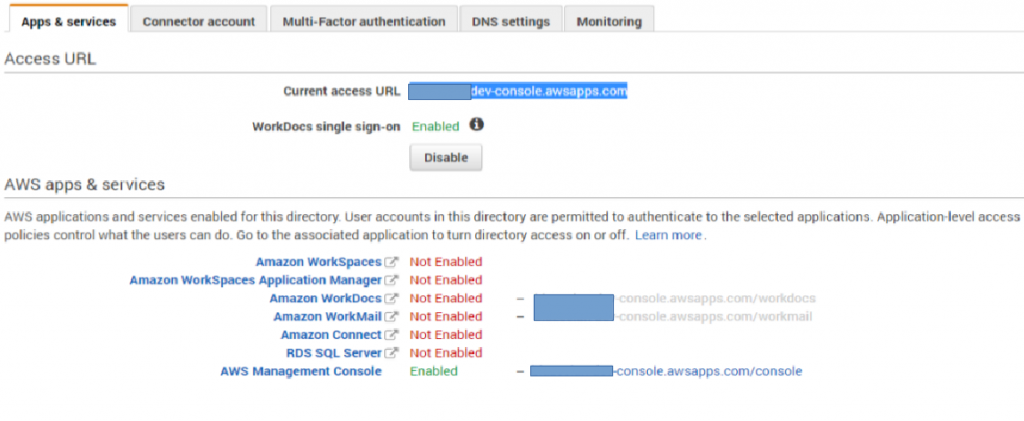
Your directory Access URL should be in the following format: <access-alias>.awsapps.com. In this example, I am using https:// devopsage-dev-console.awsapps.com.
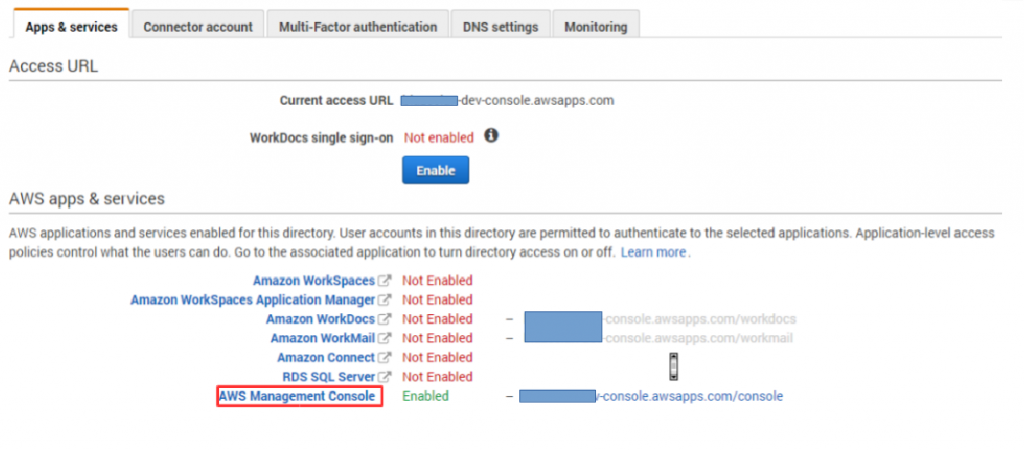
- Enable AWS Management console access.
- From the Directory Service console, choose your AWS Microsoft AD Directory ID. Choose the AWS Management Console link in the AWS apps & services section.
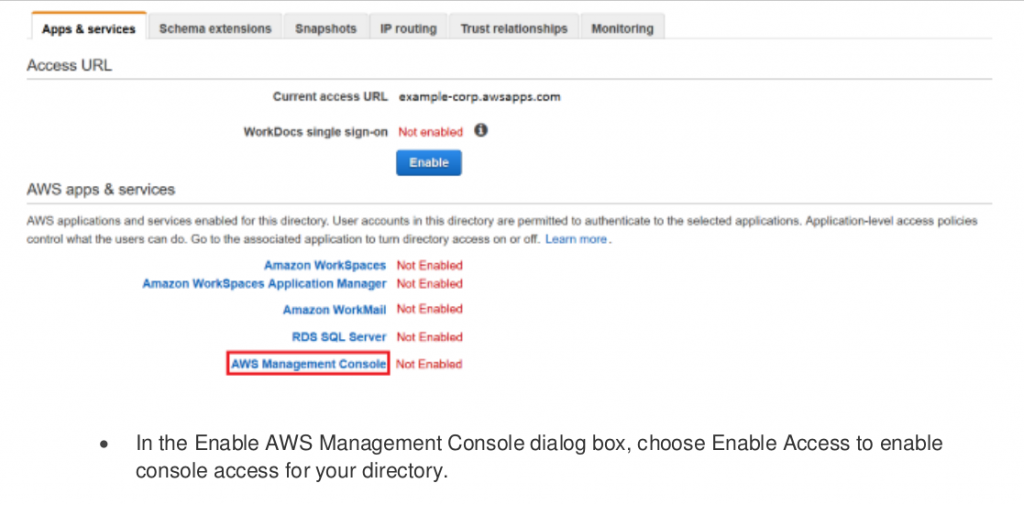
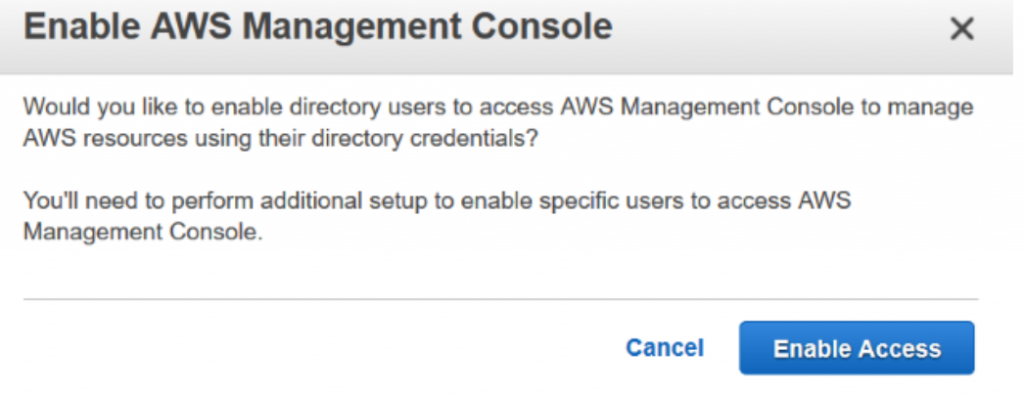
- This enables AWS Management Console access for your AWS Microsoft AD directory and provides you with a URL that you can use to connect to the console.
-
Assign on-premises users and groups to IAM roles
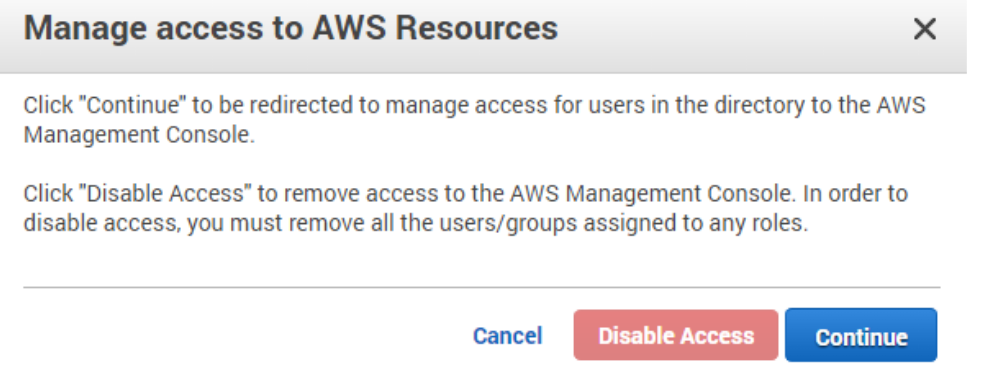
- Before you users can use your Access URL to sign in to the AWS Management Console, you need to assign on-premises users or groups to IAM roles. This critical step enables you to control which AWS resources your on-premises users and groups can access from the AWS Management Console.
- Open the Directory Service details page of your AWS Microsoft AD directory and choose the AWS Management Console link on the Apps & services tab. Choose to Continue to navigate to the Add Users and Groups to Roles page.
- On the Add Users and Groups to Roles page, I see the three IAM roles that I have already configured (shown in the following screenshot).
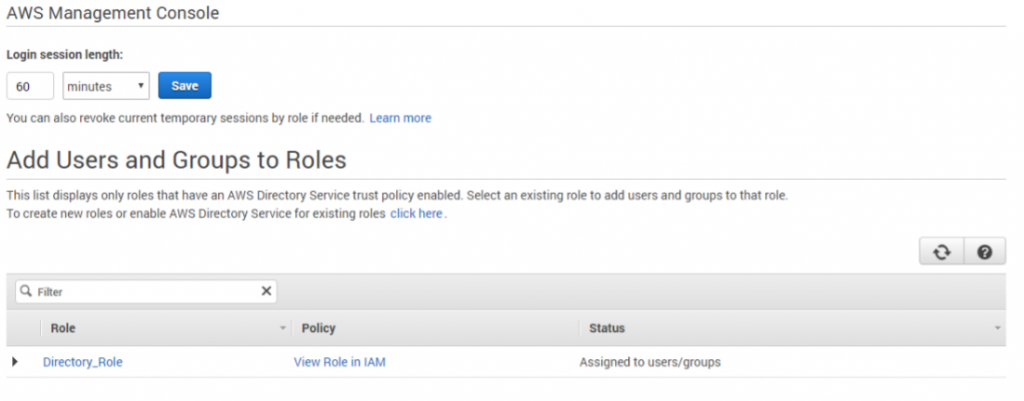
- Choose the Add button to assign users or groups to the role, as shown in the following screenshot.
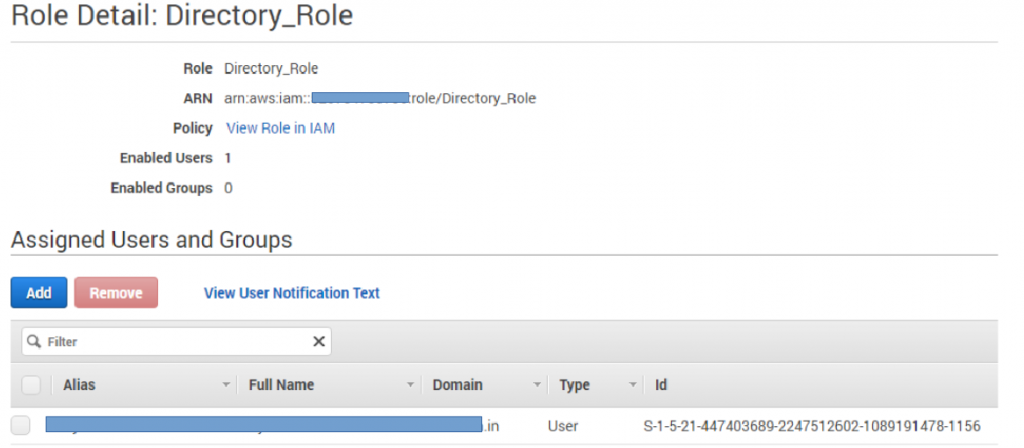
- In the Add Users and Groups to Role pop-up window, select the on-premises Active Directory forest that contains the users and groups to assign. Select the user or group and click Add
 Step 5: To create a group account in Active Directory on the Domain Controller.
You must be logged on to the Domain controller as an administrator with Read-Write permission.
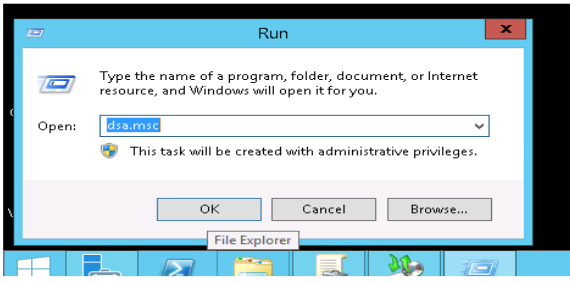
- Click Start, and open RUN type dsa.msc then open Active Directory Users and Computers
- In Active Directory Users and Computers window, expand yourdomain.in
- In the console tree, right-click the folder in which you want to add a new group.
Click New, and then click Group.

- Type the name of the new group. Use a name that you can easily associate with the role or service for which you are creating.
- In the New Object – Group dialogue box, do the following:
a. In the Group scope, click Global scope.
b. In Group type, click Security.
Click Finish.
Step 6: Adding a member to a group
To add a member to a group using the Windows interface
- To open Active Directory Users and Computers in Windows Server® 2012, click RUN, type dsa.msc .
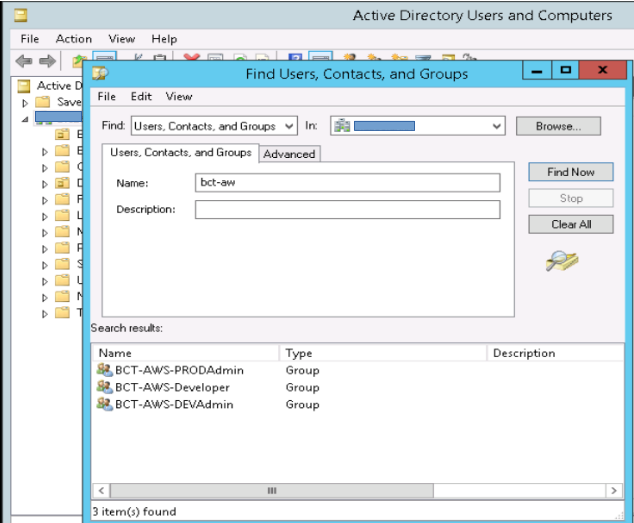
- In the console tree, right-click the yourdomin.in. Click on find tab.
- Find group name in a tab,
- We have created 3 groups for AWS access portal.
- In the details pane, right-click the group, and then click Properties.
- On the Members tab, click Add.
- In Enter the object names to select, type the name of the user, group, or computer that you want to add to the group, and then click OK.
Step 7: Providing additional permission to a User in Domain.
- Click on the directory and navigate to the App and Services tab.
- Click on AWS Management Console Below add users and groups to Role Click on the role, here in this example say ec2-full (role provides full access to ec2).
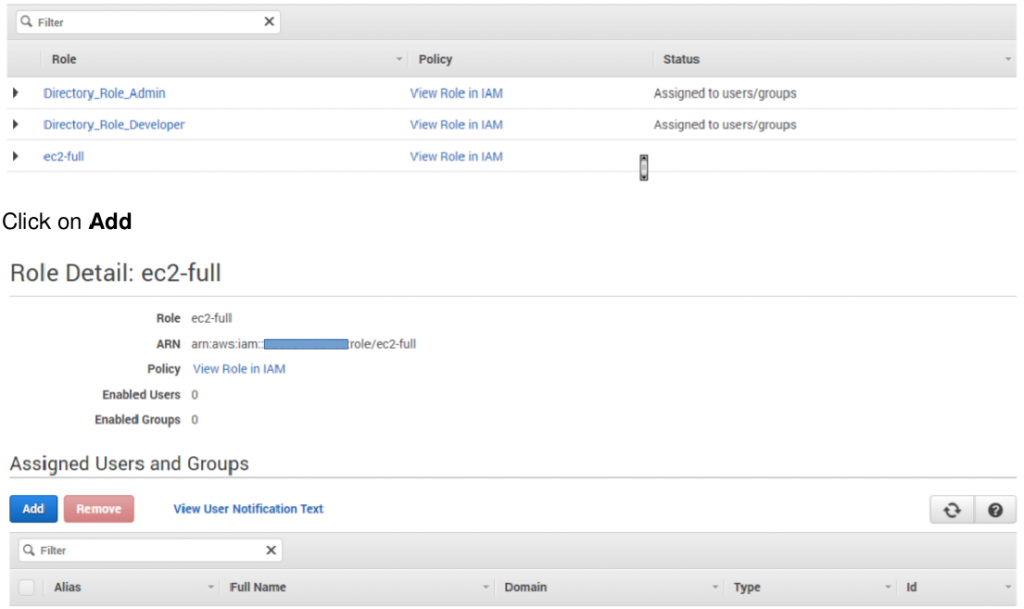
- Search for the user and click Add
- So this user will be granted with additional permission of ec2 full access.
[ Note: To revoke the permission simply select the user and click on remove, to remove that entity from that particular role]
Step 8: Connect to the AWS Management Console
- Now users can go to the URL to sign in to the AWS Management Console.
- https://enabled-link-console.awsapps.com/console
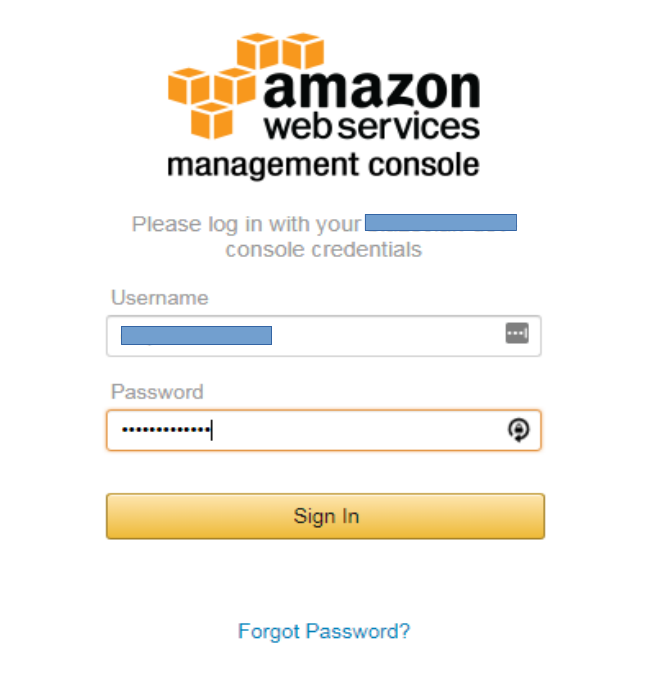
- So here, we can log in to AWS management console using our AD credentials.
If you Like Our Content here at Devopsage, then please support us by sharing this post.
Please Like and follow us at, LinkedIn, Facebook, Twitter, and GitHub
Also, Please comment on the post with your views and let us know if any changes need to be done.
Thanks!!