Kubernetes is one of the widely used Container Cluster Manager. It is an OpenSource production ready Container Orchestration tool which is used for automating deployments, Scaling and managing the containerized application. Amazon recently on 5th June 2018 launched an EKS – Elastic container Service for Kubernetes (Managed Kubernetes) which makes it easy to deploy, manage, and scale containerized applications using Kubernetes on AWS Cloud. In this blog, We will see Steps to Configure Kubernetes cluster using AWS EKS. At the time of writing this blog, EKS is available only in N Virginia and Oregon Region. So let’s get started.
AWS also introduced EKS on EU(Ireland) Region Now (30th Aug. 2018), and optimized the AMI for security and performance improvements. AWS also changed cloudformation Script for worker node, In the last script there were no option of selecting the EBS volume for worker node (default 20GB), Though it was possible to make changes to the cloudformation script to parameterize the EBS Volume Size.Now in the new Cloudformation Script AWS fixed this issue.
Step 1: Create AWS EKS Role.
First Step is to create an EKS role which kubernetes can assume to provision the required resources. In order to create the EKS Role, login to the AWS Management console, Click on Role and then Click Create Role. Select EKS under AWS Services and Click on Next: Permission.
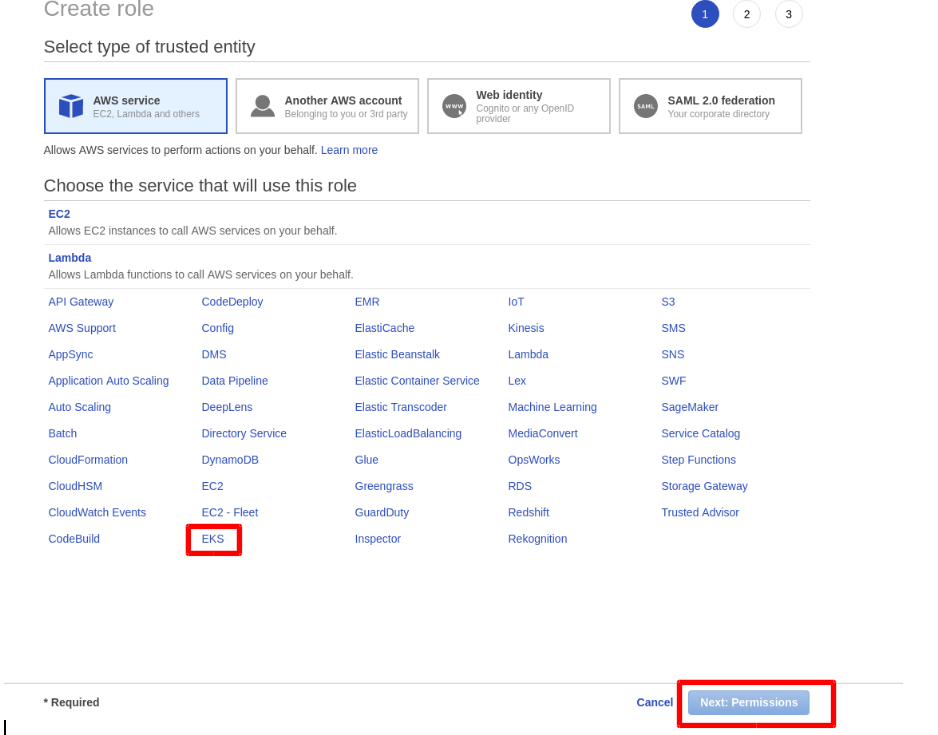
By Default, it will Select 2 Custom Policy for Role Which is,
- AmazonEKSClusterPolicy
- AmazonEKSServicePolicy
Click Next: Review
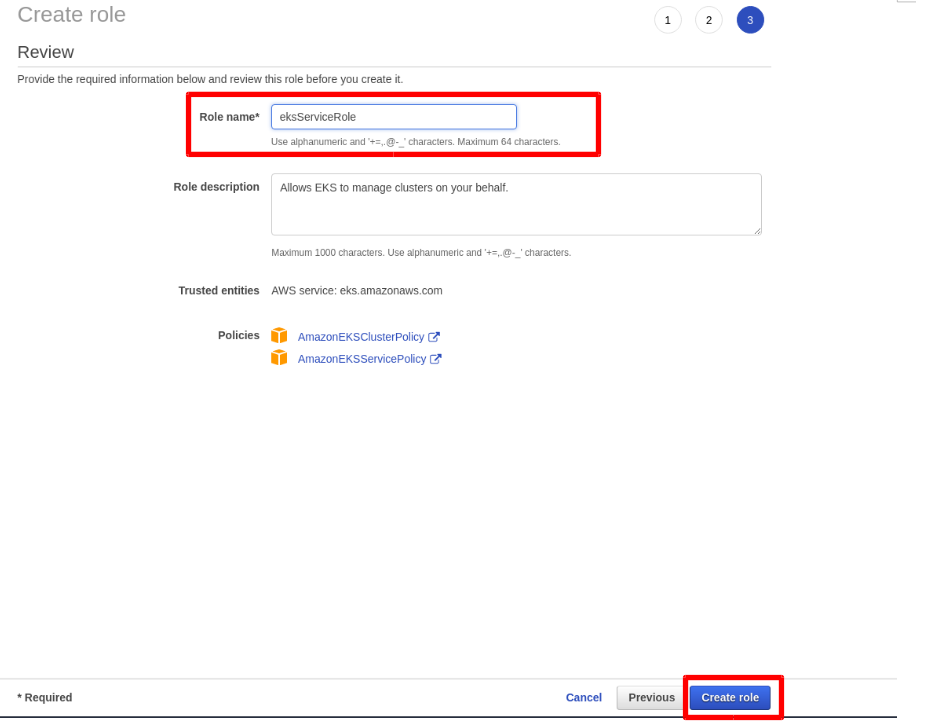
Provide Role Name and Click Create Role.
Step 2: Create VPC for EKS Cluster.
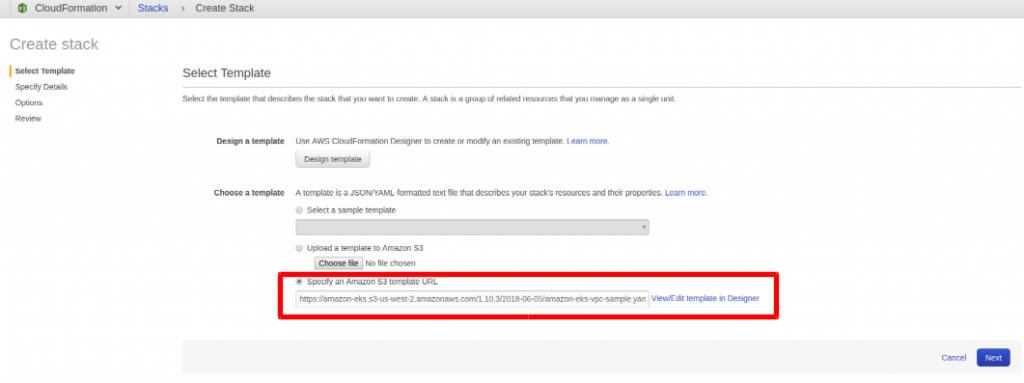
As we are done with the Role Creation, now we will be creating VPC for Cluster resources. We will use Cloudformation Script to create VPC Stack. Now Move to the CloudFormation Section and Click on Create Stack. Click on Specify an Amazon S3 Template URL and paste the below Link (Cloudformation Template) and Click Next.
https://amazon-eks.s3-us-west-2.amazonaws.com/cloudformation/2018-08-30/amazon-eks-vpc-sample.yaml
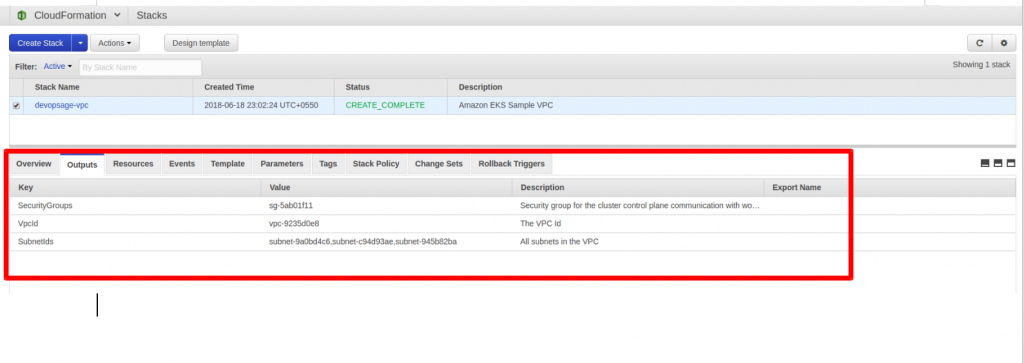
Provide the Stack Name and fill out the required parameters for VPC Stack and Click Next. Review the Details and Click on Create. Cloud formation Stack for VPC will Initiate and will be created in few mins.
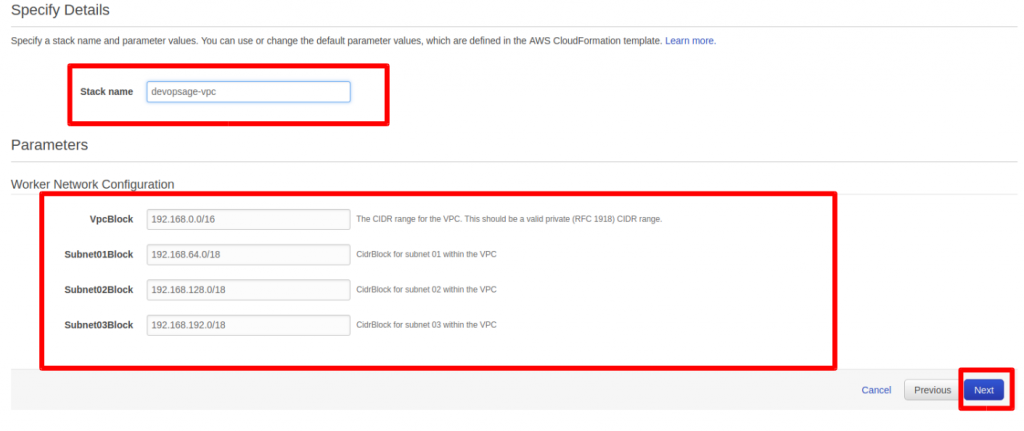
Make a Note of the Resource Output once the Stack is created, This we will use further for Cluster configuration.
Step 3: Install and configure kubectl for EKS Cluster
Amazon EKS clusters require kubectl and kubelet binaries and the Heptio Authenticator to allow IAM authentication for your Kubernetes cluster. You can install either Amazon EKS-vended version of kubectl or directly from the kubernetes documentation. In this Documentation, we will be installing Amazon EKS-Vended Version of kubectl.
Note: Here We will launch a t2.micro instance and will use it as a kubernetes client. Launch the ec2 instance (Amazon AMI Preferred) and configure aws cli on it. Make Sure You use the API credentials of the same user with whom you will launch EKS Cluster later in this section or else the client will not be able to authenticate with the EKS Cluster (Master).
Login to the instance launched and execute the below commands. (Open SSH port in Security Group).
Use the below commands to install the kubectl
[ec2-user@devopsage ~]$ sudo yum update -y

Linux: curl -o kubectl https://amazon-eks.s3-us-west-2.amazonaws.com/1.10.3/2018-06-05/bin/linux/amd64/kubectl

MaC: curl -o kubectl https://amazon-eks.s3-us-west-2.amazonaws.com/1.10.3/2018-06-05/bin/darwin/amd64/kubectl

Windows: curl -o https://amazon-eks.s3-us-west-2.amazonaws.com/1.10.3/2018-06-05/bin/windows/amd64/kubectl.exe

[ec2-user@devopsage ~]$ chmod +x ./kubectl

[ec2-user@devopsage ~]$ mkdir bin

[ec2-user@devopsage ~]$ cp ./kubectl $HOME/bin/kubectl

[ec2-user@devopsage ~]$ export PATH=$HOME/bin:$PATH

[ec2-user@devopsage ~]$ echo 'export PATH=$HOME/bin:$PATH' >> ~/.bashrc

For MacOs: echo 'export PATH=$HOME/bin:$PATH' >> ~/.bash_profile

[ec2-user@devopsage ~]$ kubectl version --short --client
Client Version: v1.10.3
(OPTIONAL) You can also install the kubectl from the kubernetes documentations. or refer the below commands.
# cd /etc/yum.repos.d
# vim kubernetes.repo

[kubernetes]
name=Kubernetes
baseurl=https://packages.cloud.google.com/yum/repos/kubernetes-el7-x86_64
enabled=1
gpgcheck=1
repo_gpgcheck=1
gpgkey=https://packages.cloud.google.com/yum/doc/yum-key.gpg https://packages.cloud.google.com/yum/doc/rpm-package-key.gpg

:wq

# yum update
# yum install kubectl -y

# kubectl version --short --client
Step 4: Install heptio-authenticator-aws for Amazon EKS
Use the below set of command to install heptio-authenticator-aws
[ec2-user@devopsage ~]$ curl -o heptio-authenticator-aws https://amazon-eks.s3-us-west-2.amazonaws.com/1.10.3/2018-06-05/bin/linux/amd64/heptio-authenticator-aws

For Mac: curl -o heptio-authenticator-aws https://amazon-eks.s3-us-west-2.amazonaws.com/1.10.3/2018-06-05/bin/darwin/amd64/heptio-authenticator-aws

For Windows: curl -o heptio-authenticator-aws https://amazon-eks.s3-us-west-2.amazonaws.com/1.10.3/2018-06-05/bin/windows/amd64/heptio-authenticator-aws.exe

[ec2-user@devopsage ~]$ chmod +x ./heptio-authenticator-aws
[ec2-user@devopsage ~]$ cp ./heptio-authenticator-aws $HOME/bin/heptio-authenticator-aws && export PATH=$HOME/bin:$PATH
[ec2-user@devopsage ~]$ echo 'export PATH=$HOME/bin:$PATH' >> ~/.bashrc
Step 5: Install AWS EKS Cluster from AWS Console
Navigate to the AWS EKS under the Compute Section in AWS Management Console. Provide the below Details in the screenshot and click Create.
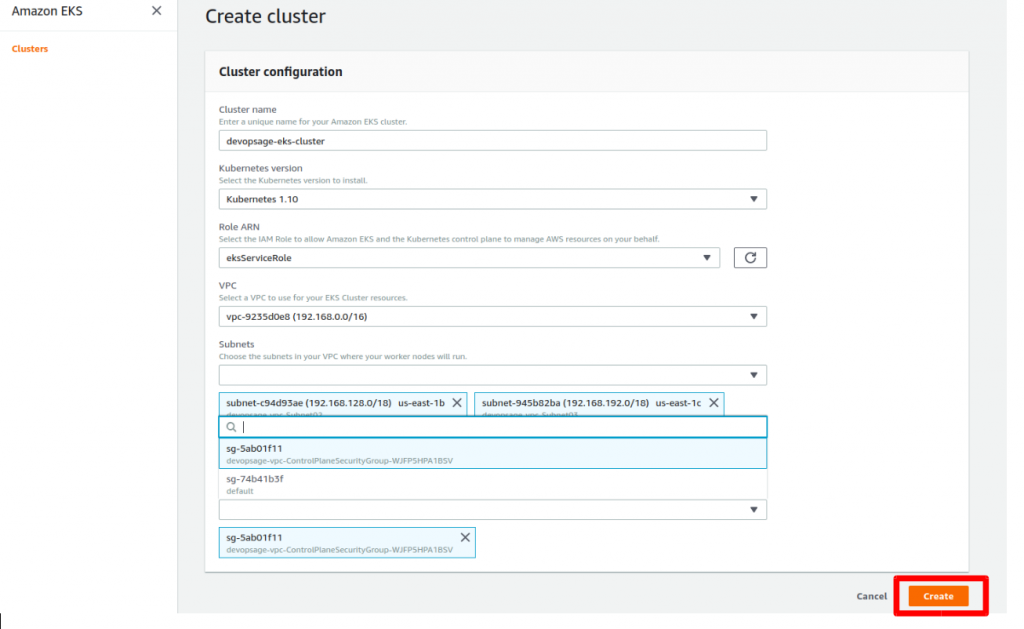
Note: It will take around 5 mins to reach cluster in the Active State.
Step 6: Configure Kubectl for EKS Cluster
Follow along with the below steps to configure the kubectl for EKS Cluster,
[ec2-user@devopsage ~]$ mkdir -p ~/.kube

[ec2-user@devopsage ~]$ cd .kube

[ec2-user@devopsage .kube]$ vim config-devopsage
apiVersion: v1
clusters:
- cluster:
    server: <endpoint-url>
    certificate-authority-data: "<base64-encoded-ca-cert>"
  name: kubernetes
contexts:
- context:
    cluster: kubernetes
    user: aws
  name: aws
current-context: aws
kind: Config
preferences: {}
users:
- name: aws
  user:
    exec:
      apiVersion: client.authentication.k8s.io/v1alpha1
      command: heptio-authenticator-aws
      args:
        - "token"
        - "-i"
        - "<cluster-name>"
        # - "-r"
        # - ""
Make Sure to replace the below parameters in the above config files,
- server: <endpoint-url>
- certificate-authority-data: “<base64-encoded-ca-cert>”
- “<cluster-name>”

[ec2-user@devopsage ~]$ export KUBECONFIG=$KUBECONFIG:~/.kube/config-devopsage
[ec2-user@devopsage ~]$ echo 'export KUBECONFIG=$KUBECONFIG:~/.kube/config-devopsage' >> ~/.bashrc
[ec2-user@devopsage ~]$ kubectl get svc
NAME         TYPE        CLUSTER-IP   EXTERNAL-IP   PORT(S)   AGE
kubernetes   ClusterIP   10.100.0.1           443/TCP   9m
So it Shows that the configuration is properly done
Step 7: Launch and Configure EKS Worker Nodes
Now we will add worker nodes and will attach it to the Cluster where we can deploy or scalable container application. We will be using the cloudformation stack to launch the Worker nodes. It launches the nodes in the AutoScaling group and will be charged accordingly.
Go to CloudFormation and Click on Create Stack, Click on Specify an Amazon S3 template URL and paste below URL there,
https://amazon-eks.s3-us-west-2.amazonaws.com/cloudformation/2018-11-07/amazon-eks-nodegroup.yaml
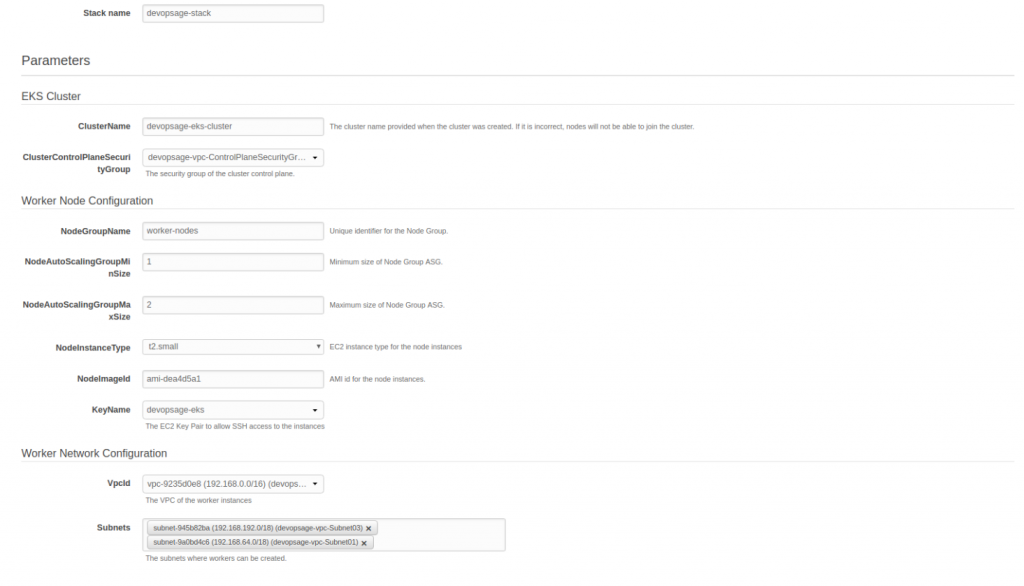
Fill Out all the required parameters and Click on Create.
Note:
- In CF Parameter Cluster Name Should match exactly with the EKS Cluster name or else, worker node will not be able to join the cluster.
- Use the VPC which we have created above.
- Amazon Provides Custom AMI for the worker node, which is usually an Amazon Linux 2 AMI
Use AMI: N Virginia : ami-0440e4f6b9713faf6 Oregon: ami-0a54c984b9f908c81 Ireland: ami-0c7a4976cb6fafd3a
Step 8: Join Worker Nodes to the Cluster.
Note: Your Client Server Terminal might hang due to the change in the outbound traffic made by the cloudformation Stack. go and check the Security group outbound rule of the client node and allow all traffic from everywhere.
[ec2-user@devopsage ~]$ curl -O https://amazon-eks.s3-us-west-2.amazonaws.com/cloudformation/2018-08-30/aws-auth-cm.yaml

[ec2-user@devopsage ~]$ vim aws-auth-cm.yaml
apiVersion: v1
kind: ConfigMap
metadata:
  name: aws-auth
  namespace: kube-system
data:
  mapRoles: |
    - rolearn: <Instance-Role_Arn>  // Make sure to provide instance role arn, not profile. Get it from the resource section of your cloudformation script.
      username: system:node:{{EC2PrivateDNSName}}
      groups:
        - system:bootstrappers
        - system:nodes

[ec2-user@devopsage ~]$ kubectl apply -f aws-auth-cm.yaml
configmap "aws-auth" created
[ec2-user@devopsage ~]$ kubectl get nodes --watch
NAME                             STATUS     ROLES     AGE       VERSION
ip-192-168-254-56.ec2.internal   Ready         28s       v1.10.3
ip-192-168-92-108.ec2.internal   Ready         25s       v1.10.3
ip-192-168-254-56.ec2.internal   Ready         30s       v1.10.3
ip-192-168-92-108.ec2.internal   Ready         31s       v1.10.3
So we have Successfully configured the EKS Cluster and registered the worker nodes to it, Quickly verify it by using below commands,
[ec2-user@devopsage ~]$ kubectl get nodes
NAME STATUS ROLES AGE VERSION
ip-192-168-254-56.ec2.internal Ready <none> 3m v1.10.3
ip-192-168-92-108.ec2.internal Ready <none> 3m v1.10.3

[ec2-user@devopsage ~]$ kubectl get svc
NAME TYPE CLUSTER-IP EXTERNAL-IP PORT(S) AGE
kubernetes ClusterIP 10.100.0.1 <none> 443/TCP 40m
Step 9: Deploy Sample Application on the Cluster
As we are done with the setup of EKS Cluster, we will deploy the famous Guestbook Application on the cluster. Guestbook is a public application available, We will be deploying it just for testing, use below commands,
[ec2-user@devopsage ~]$ kubectl apply -f https://raw.githubusercontent.com/kubernetes/kubernetes/v1.10.3/examples/guestbook-go/redis-master-controller.json
replicationcontroller "redis-master" created

[ec2-user@devopsage ~]$ kubectl apply -f https://raw.githubusercontent.com/kubernetes/kubernetes/v1.10.3/examples/guestbook-go/redis-master-service.json
service "redis-master" created

[ec2-user@devopsage ~]$ kubectl apply -f https://raw.githubusercontent.com/kubernetes/kubernetes/v1.10.3/examples/guestbook-go/redis-slave-controller.json
replicationcontroller "redis-slave" created

[ec2-user@devopsage ~]$ kubectl apply -f https://raw.githubusercontent.com/kubernetes/kubernetes/v1.10.3/examples/guestbook-go/redis-slave-service.json
service "redis-slave" created

[ec2-user@devopsage ~]$ kubectl apply -f https://raw.githubusercontent.com/kubernetes/kubernetes/v1.10.3/examples/guestbook-go/guestbook-controller.json
replicationcontroller "guestbook" created

[ec2-user@devopsage ~]$ kubectl apply -f https://raw.githubusercontent.com/kubernetes/kubernetes/v1.10.3/examples/guestbook-go/guestbook-service.json
service "guestbook" created

[ec2-user@devopsage ~]$ kubectl get services -o wide
NAME TYPE CLUSTER-IP EXTERNAL-IP PORT(S) AGE SELECTOR
guestbook LoadBalancer 10.100.116.246 ad4674e91732d11e8b16c12bd24666d9-1968070884.us-east-1.elb.amazonaws.com 3000:31526/TCP 12s app=guestbook
kubernetes ClusterIP 10.100.0.1 <none> 443/TCP 45m <none>
redis-master ClusterIP 10.100.188.79 <none> 6379/TCP 45s app=redis,role=master
redis-slave ClusterIP 10.100.135.75 <none> 6379/TCP 26s app=redis,role=slave
Execute below commands to check pods and services.
[ec2-user@devopsage ~]$ kubectl get pods
NAME READY STATUS RESTARTS AGE
guestbook-6rgrl 1/1 Running 0 3m
guestbook-ndvsb 1/1 Running 0 3m
guestbook-r58t9 1/1 Running 0 3m
redis-master-vsrth 1/1 Running 0 3m
redis-slave-282w5 1/1 Running 0 3m
redis-slave-l74rv 1/1 Running 0 3m

[ec2-user@devopsage ~]$ kubectl get svc -o wide
NAME TYPE CLUSTER-IP EXTERNAL-IP PORT(S) AGE SELECTOR
guestbook LoadBalancer 10.100.116.246 ad4674e91732d11e8b16c12bd24666d9-1968070884.us-east-1.elb.amazonaws.com 3000:31526/TCP 3m app=guestbook
kubernetes ClusterIP 10.100.0.1 <none> 443/TCP 48m <none>
redis-master ClusterIP 10.100.188.79 <none> 6379/TCP 3m app=redis,role=master
redis-slave ClusterIP 10.100.135.75 <none> 6379/TCP 3m app=redis,role=slave
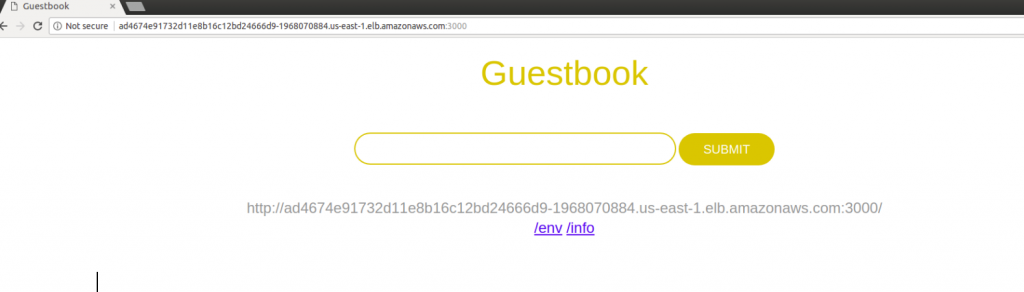
Now hit the ELB endpoint along with the port on URL to check whether the Application is successfully deployed or not.
http://ad4674e91732d11e8b16c12bd24666d9-1968070884.us-east-1.elb.amazonaws.com:3000 // Will be different in your case, get your endpoint from "kubectl get svc"
If you Like Our Content here at Devopsage, then please support us by sharing this post.
Please Like and follow us at, LinkedIn, Facebook, Twitter, and GitHub
Also, Please comment on the post with your views and let us know if any changes need to be done.
Thanks!!
Simply want to say your article is as astonishing. The clearness on your publish is
simply cool and i can assume you are knowledgeable on this
subject. Fine along with your permission let me to clutch your feed to stay updated with drawing close
post. Thanks 1,000,000 and please carry on the gratifying work.
Hi Ahmed,
Using AWS EKS is a bit different than using kops or general Master Worker Setup. Kubernetes Master itself is managed by AWS and all the Worker Nodes are being Created using the Cloudformation Templated having a prebaked AMI for different regions. When We launch the worker Nodes, It comes with a set of the script which runs in the form of user data in order to attach the worker nodes with the master. At this moment I’m not sure whether we can use our physical data centre Server as a worker node or not. Though You can try,
1. Connecting your AWS Infra with ONprem, Probably using the VPN Tunnel or Direct Connect. Once that will be created then we can start communicating with the Data Centre Server With ec2 instance.
2. Check Installing all the Packages and required Configuration in the user Data Section, while launching Worker node from the cloudformation template to your datacentre server.
3. Check if it Joins as a Worker Node of your kubernetes cluster or not.
I think, probably its not supported at this time, maybe we have to check and verify. Thanks
Is it possible to have kubectl configured on a local windows machine as Kubernetes client? Please confirm what needs to be done
I think no. We can not use our local machine as a client when using AWS EKS. Local machine can be used as a client when using Kops.
very nice documented
Thanks!
Thanks again for you tutorial. I think in ”Step 8: Join Worker Nodes to the Cluster.”, it would not be a bad idea to mention that data: mapRoles: | – rolearn: comes from the output tab (in CloudFormation) from the value of the key NodeInstanceRole.
Hi Julien,
Thanks for highlighting this. I will add this to the post. Thanks!