In one of our previous article we has seen the installation process of OpenVPN Server and how we can connect to the Servers in the Private Subnet Using OpenVPN Server. This article is basically for the users who uses Ubuntu/Linux Desktop for their work.
For Windows, OpenVPN Provodes Client to Connect to It, but for the Users working on ubuntu Machine, they can connect to VPN Server Using Terminal and the best way is to Use Network Manager for quick connectivity. Please refer our previous blog on OpenVPN to have more Clearity on It.
Let’s Start with the Setup process of Network Manager.
Step 1: Create Directory Structure.
Make a directory in home directory with any name say openvpn.
# mkdir ~/openvpn
# cd ~/openvpn
If you have the client.ovpn file in the Downloads, Just make a copy of it to the home directory under openvpn folder.
# cp ~/Desktop/client.ovpn .
Step 2: Install Network Manager Package
Install the required Packages on your Machine.
$ sudo apt-get install network-manager-openvpn-gnome openvpn unbound network-manager
# sudo chmod +x /etc/resolvconf/update.d/unbound
# sudo /etc/init.d/network-manager restart
Step 3: Extract Required Data from client.ovpn file
Next, we need to extract some data out of the client.ovpn, and for this we followed these instructions, which is shown below.
Note: make sure that all the below files are in same ~/openvpn folder
- Open client.ovpn in your favour text editor and copy the lines between the <ca> tags into a new file named client.ca
- Remove <ca> section including tags.
- Now copy the lines between the <cert> tags into a new file named client.crt.
- Remove <cert> section including tags.
- Now copy the lines between <key> tags into a new file named client.key.
- Remove <key> section including tags.
- Now copy the lines between <tls-auth> tags into a new file named client.tls and remove <tls-auth> section including tags.
- Remove the line “key-direction 1”.
- Insert the following text above the line # —–BEGIN RSA SIGNATURE—–
ca client.ca
cert client.crt
key client.key
tls-auth client.tls 1
Open Client.ovpn file and comment the below line
An out-of-the-box OpenVPN 2.6.1 Access Server user-locked configuration file only needs 1 parameter changed to import with the “network-manager-openvpn-gnome” tool.
The line that says:
reneg-sec 604800
Comment that out.
# reneg-sec 604800 —> comment only this line.
Finally, save and close all the files and check that you now have all the above files stored in your ~/openvpn directory. Also check permissions once done.
Go to Network Manager -> Edit Connections ->VPN and click Import, browse to the modified client.ovpn and import that file. Also give the name of your VPN Connection as per your understanding.
Enter your vpn username and password.
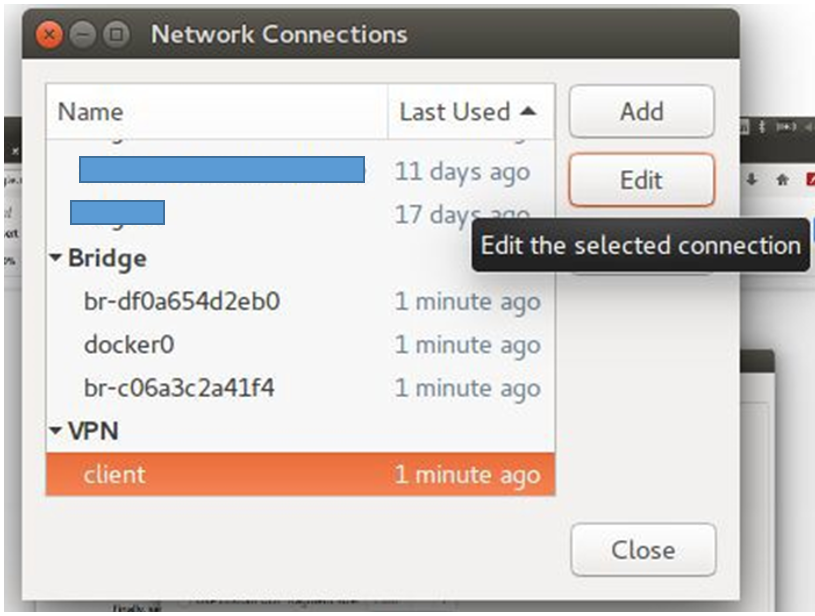
Step 4:
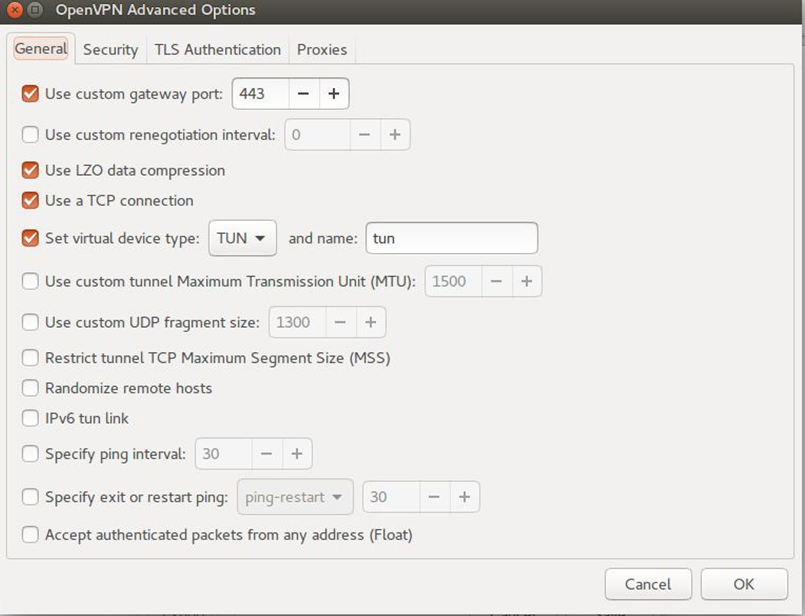
Goto Network Connections and choose the new VPN which has been imported recently and click on edit.
Choose Advanced button and make sure that below options are checked.
Under IPV4 setting choose Routes button and choose the below option

Click Ok and Save the Changes. Once this is done, try connecting to VPN and connect to the Servers in the Private subnet.
Reference Post!
How to Setup OpenVPN Access Server on Ubuntu/CentOS.
If you Like Our Content here at Devopsage, then please support us by sharing this post.
Please Like and follow us at, LinkedIn, Facebook, Twitter, and GitHub
Also, Please comment on the post with your views and let us know if any changes need to be done.